Unlock the potential of Power Apps and Flow integration with Course Elevate’s comprehensive guide. Learn how to connect Power Apps with Flow and streamline your processes for enhanced efficiency. Discover seamless workflows as you explore the steps to connect Power Apps with Flow in this informative resource.
Connecting Power Apps with Power Automate (Flow) opens up a world of possibilities for automating processes and enhancing user experiences. Here’s a step-by-step guide on how to achieve this seamless integration: As an example, we will send an email using power Automate.
Step 1: Create a Power App
Log in to your Power Apps account.
Click on “Create” to start building a new app.
Choose the layout and design that best suits your needs.
Add data sources and design screens as required.
Step 2: Add a Button
In your Power App, select the screen where you want to add the button.
Add a button control to the screen.
Name the button and customize its appearance.
Step 3: Create a Flow from Power App
In Power Apps, select the button you added earlier.
From left navigation tab, click on “Power Automate.”
Choose “Create a flow” to start building a new flow as shown.
Step 4: Build the Flow in Power Automate
You’ll be redirected to Power Automate.
In Power Automate, choose instant flow as trigger with “Power Apps”.
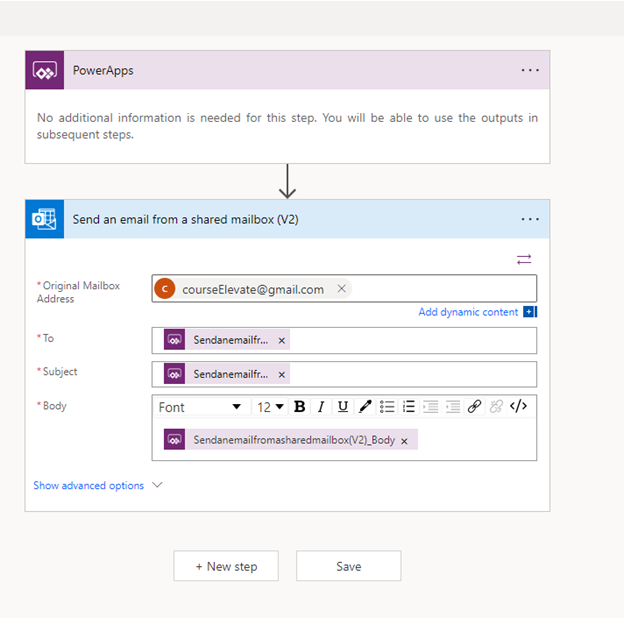
Add an action to the flow. Search for and select the “Send an email from a shared mailbox (V2)” action.
Configure the action by providing the recipient’s email address (you’ll get this from the Power App) and the email subject and body (which can also come from the Power App). Save the Flow with name SendFeedBackEmail”.
Step 5: Save and Test the Flow
Save your flow in Power Automate.
Run a test to ensure that the flow behaves as expected.
Make any necessary adjustments and re-test if needed.
Step 6: Return to Power Apps
After testing the flow, return to Power Apps.
In the Power Apps editor, click on the button that triggers the flow.
Configure the “OnSelect” property of the button to call the Power Automate flow you created and add following code.
SendFeedBackEmail.Run("courseElevate@gmail.com","Hi","This is an Email Body");
Step 7: Publish the Power App
Once you’ve set up the button and connected it to the flow, save and publish your Power App.
Users can now use the app and trigger the Power Automate flow seamlessly.
By following these steps, you’ll successfully connect Power Apps with Power Automate, enabling efficient automation and enhancing the functionality of your custom apps.
test comments from vikram